

Jenkins is an open-source automation tool written in Java with plugins built for Continuous Integration purposes. Jenkins is used for building and testing your software projects continuously making it easier for developers to integrate changes to the project and making it easier for users to obtain a fresh build.
In this article, we will focus on how to create a proper set of deployment steps that can be used in most of the projects.
Scenario:
Clone the project from the repository. Run the SonarQube scanner. Build it and host it locally. Zip the SonarQube reports + build files. Send build files(.zip) through FTP to the remote server. Emailing the build status.
A .NET Visual Studio based project is used in the below solution.
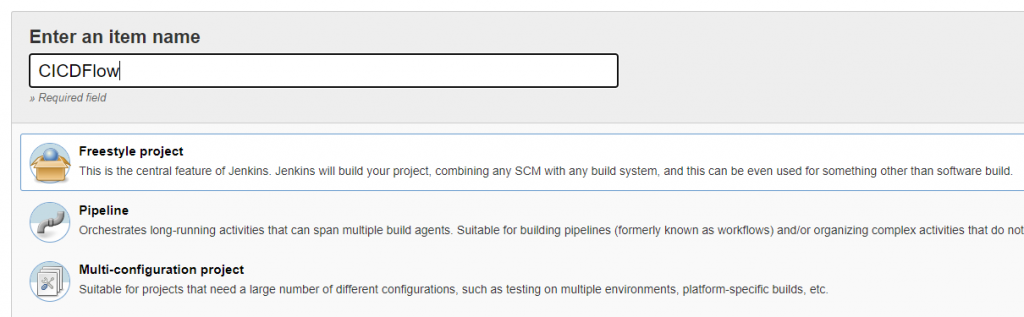
Step 1: Create a Jenkins repository.
Step 2: Cloning the project source from a git repository.
Step 3: Backing the previously hosted project.
Step 4: Remove any unwanted directories/files which conflict with the build process. (Optional)
Step 5: Running the SonarQube Scanner for MSBuild – Begin Analysis
Step 6: Restoring NuGet Packages.
Step 7: Building the solution using MS Build.
Step 8: Running the SonarQube Scanner for MSBuild – End Analysis.
Step 9: Moving the release files to the local publish location.
Step 10: Generating and downloading the SonarQube report.
Step 11: Zipping the release files.
Step 12: Sending the release files(.zip) through FTP.
Step 13: Emailing the build status.
Step 1: Create a Jenkins repository.
- Open the Jenkins URL in the browser. Enter the name of the project and click on the “Freestyle project” and press “OK”.
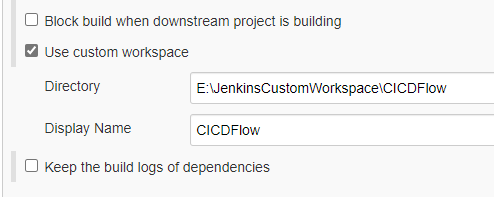
- Go to the “General” section and press “Advanced”. Select “Use Custom Workspace”. This step ensures that to create a separate location in order to use as the location to clone files and to the rest of the operations.
Step 2: Cloning the project source from a git repository.
- Navigate to the “Source Code Management” section.
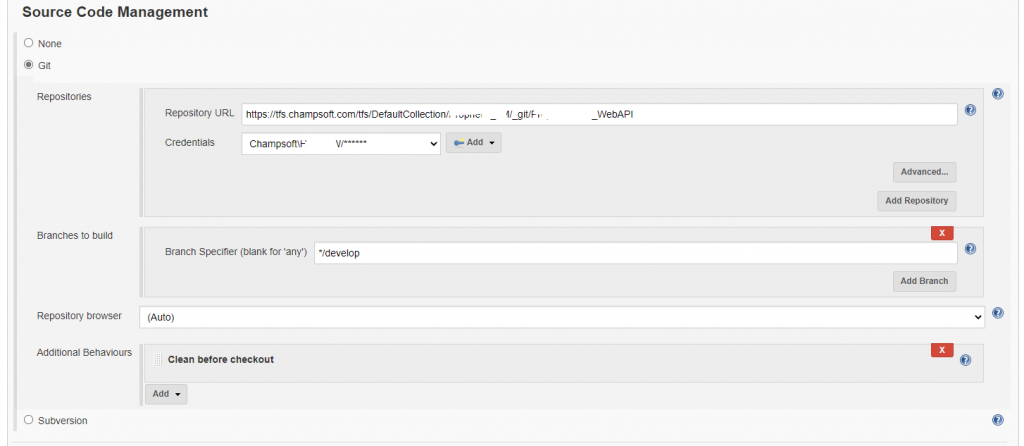
- Type the repository URL and select the credentials.
- Git credentials for the added repository should be selected.
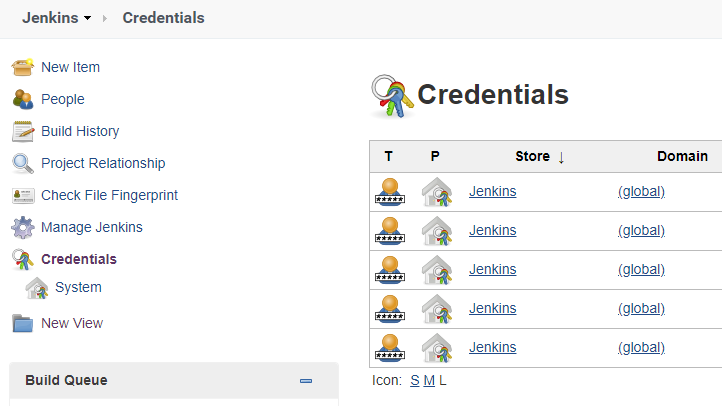 Credentials insertion can be found by navigating to Jenkins -> Credentials
 - Type the branch name.
- Select the “Additional Behaviour” as “Clean Before Checkout”.
This will Clean up the workspace before every checkout by deleting all untracked files and directories, including those which are specified in gitignore. It also resets all trackedfiles to their versioned state. This ensures that the workspace is in the same state as if you have cloned and checked out in a brand-new empty directory and ensures that your build is not affected by the files generated by the previous build.
Step 3: Backing the previously hosted project.
- Navigate to the “Build” section.
- Select “Execute Windows batch Command”.
xcopy /y "C:\inetpub\wwwroot\HostedLocationOfCICDFlow"
"E:\JenkinsBackups\CICDFlow_%date:~-4,4%%date:~-10,2%%date:~7,2%_%TIME:~0,2%_%TIME:~3,2%_%TIME:~6,2%" /E /I
xcopy command copies the files from one location to another.
/y = Suppresses prompting to confirm that you want to overwrite an existing destination file.
/E = Copies all subdirectories, even if they are empty.
/I = If Source is a directory or contains wildcards and Destination does not exist, xcopy assumes Destination specifies a directory name and creates a new directory. Then, xcopy copies all specified files into the new directory. By default, xcopy prompts you to specify whether Destination is a file or a directory.The above code will copy the previously hosted files to a backup location creating a folder named “CICDFlow_<CurrentDateTime>”. It will follow the conditions specified by the above-mentioned flags.
Step 4: Remove unwanted directories/files which conflict with the build process. (Optional)
- Select “Execute Windows batch Command”.
rmdir /q/s E:\JenkinsCustomWorkspace\CICDFlow\FolderNotToBeShared;
rmdir = Remove directory.
/q = Usually rmdir raises a question when a directory has a tree. This command will suppress the question to be raised.
/s = Removes all directories and files in the specified directory in addition to the directory itself. It is used to remove a directory tree.
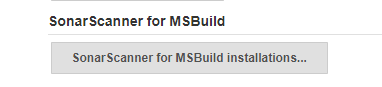
Step 5: Running the SonarQube Scanner – Begin Analysis
Since we are using a .NET Application for this scenario, it is required to have “SonarQube for MSBuild”.
Proceed with the following link to install it.
https://docs.sonarqube.org/display/SCAN/Installing+the+SonarQube+Scanner+for+MSBuild
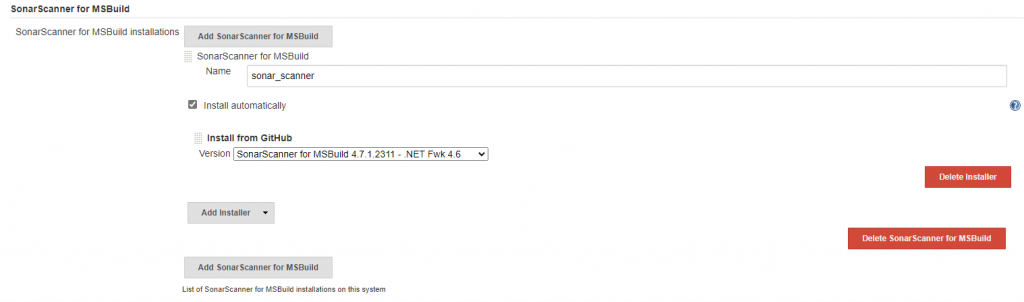
- Once the unzip process completes to ‘C:\SonarQube\bin’ go to Jenkins -> Manage Jenkins -> Global Tool Configuration and click on “Add SonarScanner for MSBuild”.
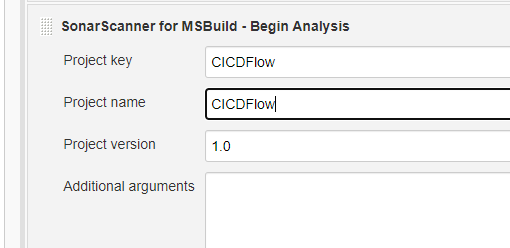
- Once the tool configuration completes, proceed with the next steps in the “Build” section. Click on “Add Build Step” – “SonarScanner for MSBuild – Begin Analysis”.
- Enter the “Project Key” and “Project Name”. “Project Key” should match the key when creating the project in the SonarQube Server.
Step 6: Restoring NuGet Packages.
It is required to have NuGet.exe in order to proceed with this step. NuGet.exe can be downloaded from the NuGet web site.
https://www.nuget.org/downloads
- Add another build step as “Execute Windows Batch Command” and type the URL which contains the nuget.exe batch file.
Step 7: Building the solution using MS Build.
- Navigate to “Global Tool Configuration”.
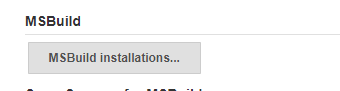
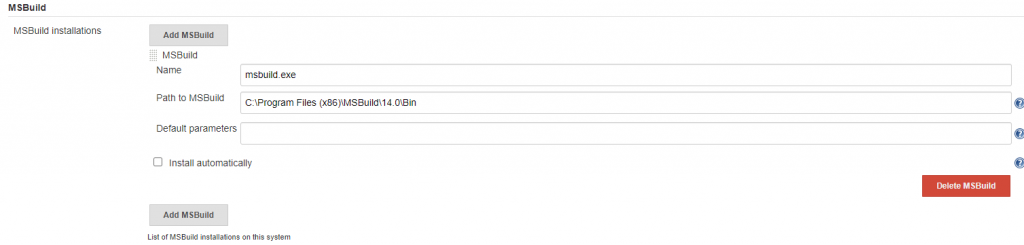
- If MSBuild.exe cannot be found, follow the below steps.
- Download MSBuild plugin.
- MSBuild in the previous versions of .NET Framework was installed with it but, they decided to install it with Visual Studio or with the package BuildTools_Full.exe.
The path to MSBuild when installed with the .NET framework: If MSBuild.exe cannot be found, follow the below steps. C:\Windows\Microsoft.NET\Framework[64 or empty][framework_version]The path to MSBuild when installed with Visual Studio is:
C:\Program Files (x86)\MSBuild[version]\Bin for x86 and, C:\Program Files (x86)\MSBuild[version]\Bin\amd64 for x64.
The path when BuildTools_Full.exe is installed is the same as when MSBuild is installed with Visual Studio. - Open the Microsoft command line. I’m using Visual Studio 2019, so my command line is “Developer Command Prompt for VS 2019”.
Then run the command: where msbuild - MSBuild is no longer installed in the Global Assembly Cache. To reference MSBuild programmatically, use NuGet packages. MSBuild is now installed in a folder under each version of Visual Studio. For example, C:\Program Files (x86)\Microsoft Visual Studio\2017\Enterprise\MSBuild.
You can also use the following PowerShell module to locate MSBuild: vssetup.powershell.MSBuild is no longer installed in the Global Assembly Cache. To reference MSBuild programmatically, use NuGet packages. Once installed, navigate to the “Build” section and select “Build a Visual Studio project or solution using “MSBuild” and add the below properties.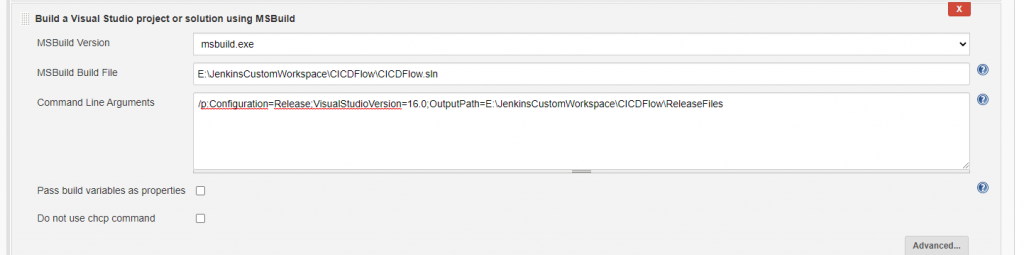 This will build the solution and it will move the build files to a folder named “ReleaseFiles” as mentioned in the “Command Line Arguments”.
Step 8: Running the SonarQube Scanner for MSBuild– End Analysis.
- Add a “Build Step”, “SonarScanner for MSBuild” – End Analysis.
Step 9: Moving the release files to the local publish location.
The build files located in the “ReleaseFiles” folder can be moved to the project host location by following the steps mentioned in “Step 3”.
Step 10: Generating and downloading the SonarQube report.
- For the report generation process, Sonar CNES Report can be used. It is an open-source reporting tool that provides a detailed description of the code.
To download and integrate with SonarQube, follow the instructions in the below page: https://github.com/lequal/sonar-cnes-report - Once it is successfully integrated with the SonarQube, navigate to the below page in SonarQube.
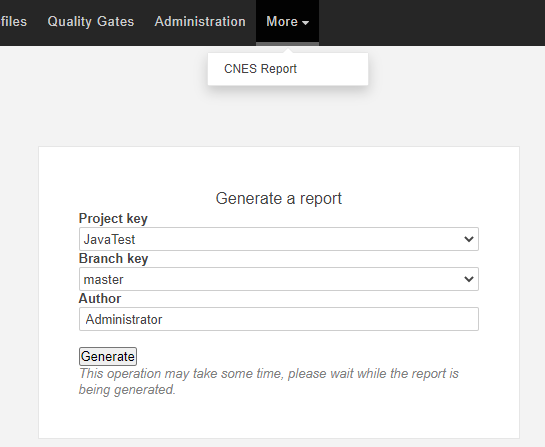
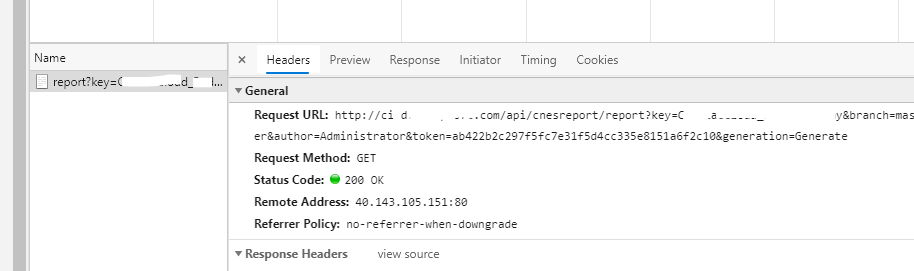
- The report can be downloaded manually. However, how can we call this report within the build process? Open F12 and press the “Generate” button. In the Network tab, Headers section, the request URL can be acquired.
- In order to call the acquired URL within the Build process, it is required to have an “HTTP Request” plugin in Jenkins.
- Install the Plugin using the below link: https://plugins.jenkins.io/http_request/

- Once the plugin is installed, navigate to the “Build” section and “Add Build Step” and select “HTTP Request”.
- Paste the URL and select “GET” as the HTTP Mode. Ignore SSL Errors as well.

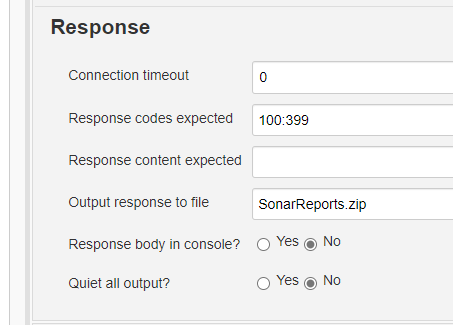
- Press “Advanced”, and navigate to the “Response” section. Add “Output response to file” and provide the filename required with the extension.
Step 11: Zipping the Release files.
7zip can be used to compress the files.
https://www.7-zip.org/download.html
“Execute Windows Batch Command” specifying the below command.
7z a ./CICDFlowCompressed.zip ./ReleaseFiles/_PublishedWebsites/CICDFlow
a = Add files
This will create a compressed file named “CICDFlowCompressed” by compressing the content found in “./ReleaseFiles/_PublishedWebsites/CICDFlow”
** The tasks have to be done with the Jenkins “Build” section finished with the above step. **
Step 12: Sending the build files(.zip) through FTP.
The below plugin needs to be installed with Jenkins in order to proceed with the FTP process.
https://plugins.jenkins.io/publish-over-ftp/
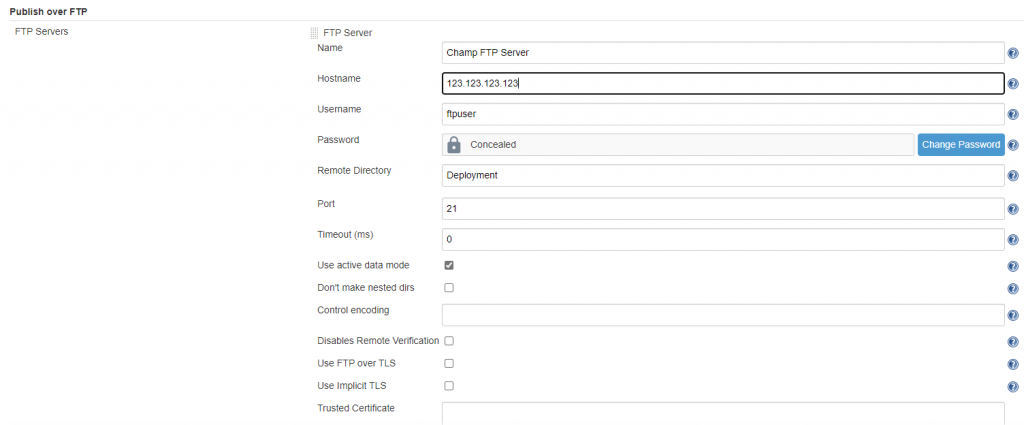
- Once the package installs successfully, Navigate to Jenkins -> Manage Jenkins -> Configure System -> and navigate to the “Publish Over HTTP” section. Enter the server details as shown below.
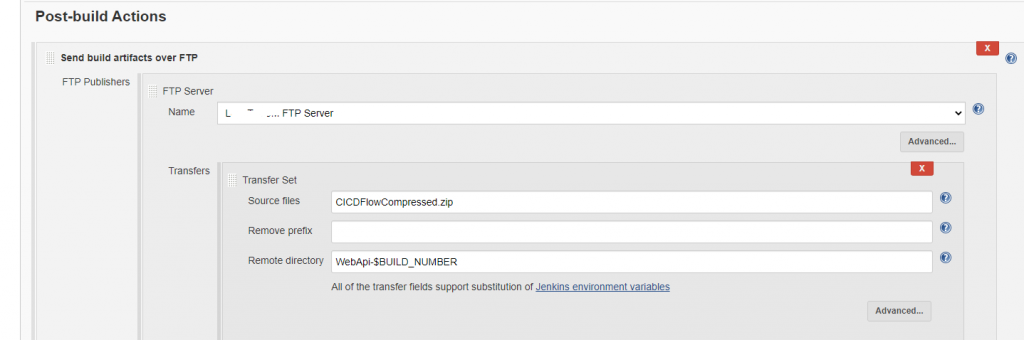
- Once configured, Navigate to the “Post Build Section” and add a post-build action selecting “Add Build Artifacts over FTP” Add “FTP Publishes” and “Transfer Sets” as below.
Step 13: Emailing the build status.
Add another post-build action and add “Editable Email Notification”. By default, the default system variables can be seen as assigned to most of the email related fields.
- Scroll down and press “Add Trigger”.
- The trigger event can be selected.
- Update the “Send To” list by selecting the proper audience.