

The importance of API Load Testing besides functional tests of the API?
Load testing is a great way to help mitigating performance risks, because it ensures an API can handle an expected load. It is difficult to identify these heavy load because there is no such a production load in development environments. So it is very important of simulating multiple users sending requests to the server at the same time in Development/QA environments. So that will be useful to identify heavy load before they reach Production environments and make sure that the API is able to scale to multiple concurrent tests.
What is API load testing?
Load testing is simulating load that is expected to see in production to your application servers in order to determine how the application behaves before it goes live. It’s a way to check whether the application can handle the load that is needed to handle with the potential customers. API load testing is going through this process by simulating multiple users sending requests to the server at the same time.
There are different ways that can be done load tests, but API load testing is one of the easiest methods at a low cost as it’s simple to script and there are many open-source tools for beginners which can be used very easily.
Benefits of API load testing
API load testing has a lot of benefits when utilized in the proper context.
- API load testing can be a great way to simulate users at a low cost. APIs allow you to send requests to your server while bypassing the UI layer.
- When testing your website, app or API endpoint under a load, you are actually simulating how it will perform when there is multiple users visit it, in real scenarios as your system can perform totally differently for one user compared to too many concurrent users due to the system’s resources.
- Response time, error rate, memory leakage, and CPU might be top-level when you are running functional tests. But, when number of users running the tests from worldwide above KPIs might not be same as earlier. Load test will help to understand where and when your system breaks, fix the problems and avoid getting users unsatisfied and revenue loss.
Limitations of API Load Testing
API load testing is one of the most important parts of testing and all teams should add to their testing Process. However there are some limitations of API load testing:
- API load testing does not simulate real users interacting with elements of your webpage
- You can’t get an idea through API load testing how user-friendly your application is. It doesn’t measure front-end performance or how quickly pages render in different browsers.
Apache JMeter
Apache JMeter is the tool that will be used to do a basic load testing for APIs in this article.
Apache JMeter is an open source software and which can be used to simulate loads of various scenarios and output performance data in several ways, including CSV and XML files, and graphs.
Apache JMeter Features
Apache JMeter may be used to test performance both on static and dynamic resources, Web dynamic applications.
According to the documentation, Following are some of Apache JMeter features
- Ability to load and performance test many different applications/server/protocol types.
- Full-featured Test IDE that allows fast Test Plan recording (from Browsers or native applications), building and debugging.
- Command-line mode (Non-GUI/ headless mode)
to load test from any Java compatible OS (Linux, Windows, Mac OSX, …) - A complete and ready to present dynamic HTML report.
- Easy correlation through the ability to extract data from most popular response formats, HTML, JSON, XMLor any textual format.
- Complete portability and 100% Java purity.
- Full multithreadingframework allows concurrent sampling by many threads and simultaneous sampling of different functions by separate thread groups.
- Caching and offline analysis/replaying of test results.
Getting Started with JMeter
Install Apache JMeter
Since JMeter is a pure Java desktop application, it is mandatory to have fully compliant JVM in your machine. For the latest version of Apache JMeter 5.4 requires Java 8+
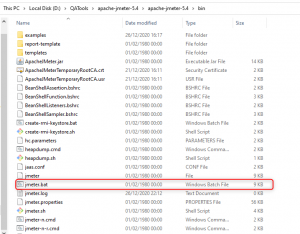
First, you should download JMeter from the Apache JMeter website. Once you are done with downloading you can simply unzip the zip/tar file into the directory where you want JMeter to be installed. Then move to the /bin folder inside.
Launch JMeter
There are 3 modes to start JMeter: GUI Mode, Server Mode and Command Line Mode
Start JMeter in GUI Mode
If you are using Windows, just run the file /bin/jmeter.bat to start JMeter in GUI mode as shown below
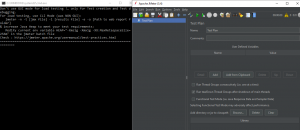
If that was successful below console log and GUI should be visible as follows. Test Plan has been added by default when you open the GUI
Rest API Login Test
Most Rest APIs work with the following login workflow that we can use to simulate a login with JMeter
- Login using an HTTP POST Request with valid username and password
- Receive a temporary authentication token that can be used for next requests
- Send the auth tokenwithin upcoming requests through HTTP Headers like Authorization: Bearer ${token}
Test Plan
JMeter has already been started in above steps. Now Select Test Plan on the JMeter panel
You can view the Test Plan as a container for running tests. It defines what to test and how to move on. A test plan will have some of the elements such as; Thread groups, Logic controllers, Timers, Pre and Post Processors, Configuration Elements etc. You can simply add or remove above elements to a Test Plan by right-clicking on the name of the Test Plan
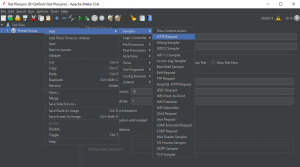
Add Thread Group
We need to have at least one Thread Group for the test plan in order to run the load test.To add a Thread Group, right click on the Test Plan and then Add -> Threads -> Thread Groups

Add HTTP Request
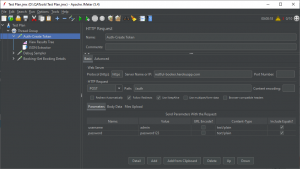
Then you have to add HTTP Request and enter the Server name or IP of your API and set the Path and Parameters. To add HTTP Request, right click on Thread Group and then Add -> Sampler -> HTTP Request.
- Http Method: POST, it should be a POST request, with some post parameters
- Http Protocol:https , since our Rest API is secured by SSL
- Hostname (Server Name or IP): restful-booker.herokuapp.com
- Path:/auth , (Login endpoint path)
- Parameters:
-
- username: Account username
- password: Associated password with that username
We should then receive a Json Response from the server which should look like: {“token”:”ab34d56gds5tyui”}
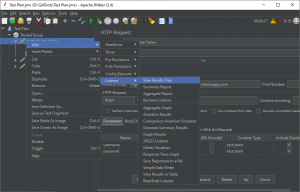
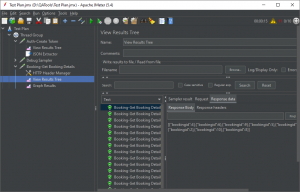
Adding a Listener
In JMeter, listeners are used to give the results of a load test. There are several types of listeners are available in the JMeter but for this test we will use View Results in Table listener.
To add a View Results in Tableelement right-click on the “Auth-Create Token” request then Add -> Listener -> View Results Tree.
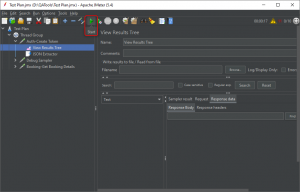
Running the Test Plan
Now we have configured the test plan correctly so we can run the test and see results. First we need to save the test plan by clicking on “File” then “Save” and give a file name.
Then select on View Results in Table element in the left panel and click Run from the main menu then click Start (or just click the green Start arrow below the main menu).
Extracting Authentication Token
We’re going to use JMeter JsonPath Extractor to extract the authentication token from the server response. First the server sends back a response to our login request and next a post-processor like JsonPath Extractor is executed afterwards. Finally the extractor extracts part of the server response and put it into a variable like ${token}.
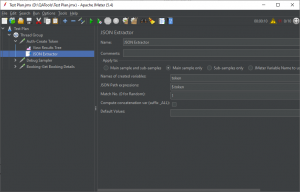
We have configured the JMeter Json Extractor with those settings:
- Name of created variables: token, this is reusable with the syntax ${token}
- Json Path Expressions: $.token
- Match No: 1, for the first occurrence. But you can leave it blank.
Add Authorization Header
There can be many endpoints which require authentication. To access these kind of endpoints, you must:
- Login to get an authentication token
- Send the Auth token within an Authorization: Bearer ${token} http request header, for each upcoming request.
Reuse Authorization Token
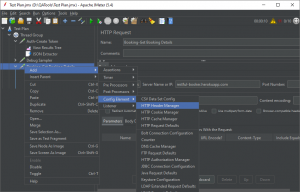
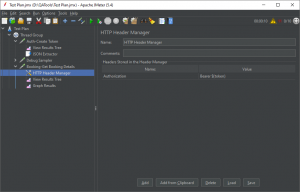
In order to reuse the above Auth token to the next endpoint we have to follow below steps as shown in the following screenshots
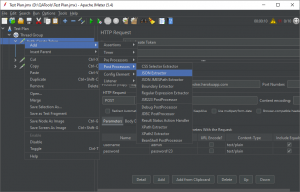
- Create new Http Request of “Booking-Get Booking Details”
- Next, add an Http Header Manager under “Auth-Create Token” HTTP Request
- Add the Authorization header, with value Bearer ${token}.
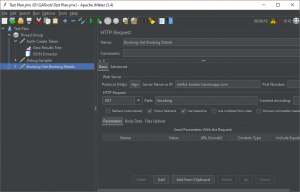
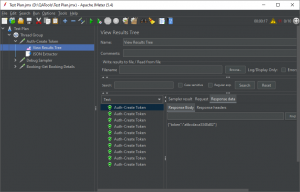
View the test results of Booking-Get Booking Details request
How to Convert Your Postman API Tests to JMeter
Step 1 : Prepare JMeter for Recording
JMeter comes with an HTTP(S) Test Script Recorder that acts as a proxy for the browser. Therefore, you can use it for intercepting requests generated by the browser. You can use it to intercept Postman, and convert the postman requests to HTTP Request Samplers of JMeter.
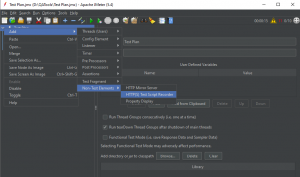
Create a fresh Test Plan (or you can use your working Test Plan also) and right click on your Test Plan and then Add -> Non-Test Elements-> HTTP(S) Test Script Recorder
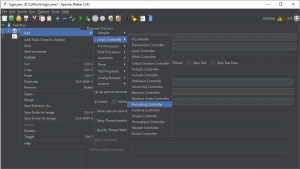
Then right click on your Thread Group and then click Add -> Logic Controller -> Recording Controller.
Step 2 : Prepare Postman for Recording
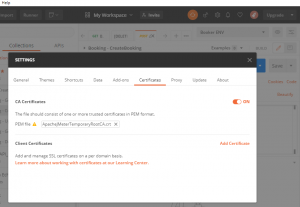
- First, import the JMeter certificate into your Postman. When you launch JMeter’s HTTP(S) Test Script Recorder, JMeter generates a self-signed certificate that allows JMeter to decrypt HTTPS requests. The file is called ApacheJMeterTemporaryRootCA.crt and you can find it in the “bin” folder of your JMeter installation.
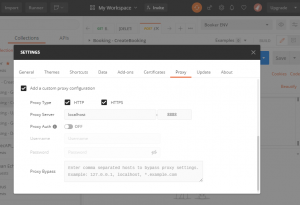
- Navigate to the Postman “Settings” screen and next to “Certificates” tab
- Toggle On for “CA certificates” and select ApacheJMeterTemporaryRootCA.crt file
Now Postman will use JMeter’s certificate and JMeter will be able to decrypt captured requests from postman
Step 3 : Configure Postman to Use JMeter as the Proxy
- Now you should navigate to the “Proxy” tab in Postman “Settings” screen
- Put a tick for “Add a custom proxy configuration” box Under Proxy configurations for sending requests
- Select both “HTTP” and “HTTPS” protocols.
- Use “localhost” as the proxy server (if your JMeter is running on the different host you can use that host)
- For Proxy port enter “8888”
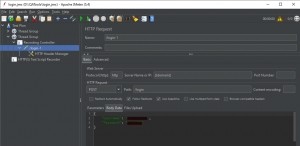
Record Your Tests from Postman to Jmeter
Now Postman and JMeter are connected and when you send your requests or collection from Postman, JMeter will capture those records and generate a HTTP Request sampler per request. If there are any HTTP Headers present JMeter will add a HTTP Header Manager to add the headers to the request as shown in the below screenshot.
JMeter is well suited for Rest API Testing, especially those based on the Json Format. Now you have understood that Testing Json APIs with JMeter is really easy. You have just begun your journey of API Load testing with jmeter. Hope these steps were easy to follow and you are able to go on and do more advanced load testing scenarios.
In this article, we discussed how to use Apache JMeter to perform basic API load and testing and how to use the graphical user interface to build a test plan and to run tests against a web server. Now you are familiar with the basic usage of JMeter and got the understanding to create new test plans to measure the performance of your APIs in various scenarios.